Friday, December 18, 2015

Thank You | Sweet Stamps

Good morning people!

I'm dropping by today to bring you a little card that I made using some beautiful floral images from the ATC line in the Sweet Stamps shop!


For this card I took the Daffodils ATC, Parrot Tulips ATC, and the Black Eyed Susans ATC red rubber stamps and stamped them with Versamark ink and heat embossed them using the White fine detail embossing powder.  Then, I used several colors of Heidi Swapp color shine with a brush to lay down the colors on my background.


Once the water colors were completey dry I cut down the panel and mounted it on a 5x7 cardbase using pop dots.  I used large letter stickers for my sentiment and finished off the card with sequins, a strip of gold scallop edge paper and a faux stitching line around the parameter to pull some more white into the design.  I love how SUPER shiny it is and how beautiful the floral images stamped.

Don't forget to drop by the Sweet Stamps store and take a look at all of the gorgeous red rubber stamps!

Later queenies!

Friday, December 11, 2015

Jingle To The Beach | Sweet Stamps

Happy Friday sweeties!

I'm dropping in today to show you a SNEAK PEAK of a SUPER cute new image from Sweet Stamps!  

What I love about these images is that they give you the option to make some holiday projects that reflect how people from warmer climates might celebrate Christmas!  I love, love, LOVE these cute, beach bum reindeer!  This lady is sunning herself under a breezy palm tree with her candy cane and a pair of sunnies! Take a look!


 I first printed and colored the image with my Spectrum Noir alcohol markers and added highlights to the image with a white gel pen.  I fussy cut the image from the paper and set it aside.  I cut two panels of holiday scrapbooking papers from the DCWV "Christmas Wishes" 4x6 mat pad from 2014.  I tore the tops of each of the panels and layered them on a burlap cardbase - also from DCWV. 


 I used a sentiment and star embellishment from MAMBI as the inspiration for my whole sentiment.  I added the "to the Beach" with a mix of tiny type stickers and burlap printed letters from Jillibean Soup. I adhered three transparent sequins around my sentiment and attached my sweet reindeer image with pop dots.  I finished the card with another embellishment that reads "the 25th".

Thanks for stopping by today!
Don't forget to go over to the Sweet Stamps' Store and get yourself a little something!!

Later queenies!

Friday, December 4, 2015

Kitty Birthday Card | Sweet Stamps

Hello lovelies!

A quick little post about a quick little card I made using Sweet Stamps' Kitty Sweets clear stamp set and Embossing Powder.

First, I stamped my image with Memento Tuxedo Black ink and colored him with my Spectrum Noir alcohol markers and fussy cut him out.  I wanted him to be wearing a little birthday hat, so I cut a triangle with a slightly rounded bottom out of a piece of patterned paper and outlined it with a black Memento marker to make it looked like it was stamped .  I then colored around the black line with white gel pen - that gave the hat the same little white border as the cat.  I attached the hat to my cat and added a button - cat complete! 


I took a DCWV cardbase and three DCWV papers from the "Dots and Stripes" line and layered strips across the middle of the card, alternating colors within my color scheme. (Tip time! If you run your fingers under the edges of each layer it will give you some nice dimension without using pop dots! Just don't put adhesive all the way to the edges!)


Finally, I attached my cat to the card base and began working on my sentiment.  I stamped the frame and the "Wishes for a great Birthday" sentiment and embossed them using Silver Fine Detail embossing powder and Black Fine Detail embossing powder - respectively.  Once the senimtent was attached - the card was done!

I know that you all enjoyed the sketch I added to one of my posts last month, so I wanted to give you one for this card as well!

Now, don't forget to stop by Sweet Stamps for all your supplies this month!  
Thanks for stopping by!
Later queenies!


Friday, November 27, 2015

Frosty Papillon | Sweet Stamps

Hello there crafty people!

I'm here today to bring you a shimmery masterpiece featuring Sweet Stamps' Starflake Medallion stamp, Large Butterfly Accent Piccolo, and Embossing Powders and Enamels!


Let's get started!
First, I took the Starflake stamp and stamped it twice on my background, once on the top right and once on the bottom left, in versamark ink.  I used white detail embossing powder to heat emboss the images.  Next, I used several colors of glimmer mist and sprayed over the embossed stamped images to create the shimmery background color.


Next, I used the same stamp and stamped it onto periwinkle cardstock, heat embossed it with the same white embossing powder, and sprayed it with clear, shimmer glimmer mist.  I cut out the shape, leaving a bit of room around the edge and attached it to the background with foam adhesive. (See below how shimmery it is?!)


Lastly I took one of the Large Butterfly Accent Piccolos and covered it with Embossing Fluid and used the same white embossing powder all over the front.  After that layer had dried I used layers of Embossing Fluid and Aged Pink Piccolo Embossing Enamel on the edges of the butterfly to create the look the the butterfly had begun to build up frost on its wings!

Lastly, I attached a gem from my stash to the middle of the butterfly and it was done!

Thank you so much for spending a little of your holiday weekend with me!  
Have a good weekend - Later queenies!


Friday, November 20, 2015

Pretty Tree Card | Piccolo by Sweet Stamps

Good Morning crafty peeps!!

I'm here today bringing you a pretty little shaker card using a beautiful range of products from Sweet Stamps called Piccolo!

When I first saw this pretty floral tree image I knew I wanted to use the Piccolo Enamel Powders to add color and dimension to the shape.


I used the Piccolo Embossing Powder Adhesive and covered the entire outside edge and several of the flowers with the adhesive liquid.  I applied Shamrock Dreams Enamel Powder and heat set it.  I repeated that method with Mardi Gras Enamel Powder and Copper Kettle Enamel Powder to cover the rest of the tree.  I finished the tree with dots of metallic pearl paint around the edges - and set it aside to dry.


I die cut an A2 sized frame out of brown glitter cardstock and layered in on top of the soft brown snowflake paper.  After the tree was completely dry, I used it to trace a window in the middle of the snowflake paper, cut it out and fit the tree into the window.

I attached clear transparency to the back of the piece, making sure to cover all the little openings in the tree, and then used foam adhesive to create a well for my shaker.  

I filled the shaker with brown seed beads from my stash and Sugar Beads from the Sweet Stamps store.  (I wish I had used a few sequins or confetti to make the shaker a little more obvious, but there's always next time!)  Lastly, I adhered the whole front piece to an A2 cardbase!

I had SUCH fun working with these products and I can't wait to break out my Piccolos again!  Take a look at the Sweet Stamps store for tons of pretty and intricate shapes like this!

Have a wonderful weekend queenies!
Later!

Friday, November 13, 2015

Mistletoe Kisses | Sweet Stamps

Hello there! Britt Bass here to share a sweet little Christmas card that I created!

I am really looking forward to the holiday season this year and I LOVE Christmas cards!  I plan on putting aside a whole day to make and mail my cards this year!

I like to make a few simple cards, a few elaborate ones. some elegant, some traditional and some cartoonish and cute!  This one definitely falls in the CUTE category!


I stamped this adorable little reindeer and holly berries with ribbon from the Reindeer Friends Stamp set and colored them with my Spectrum Noir Alcohol markers. I cut my images out and set them aside.

I used a little pattern to create the background of the card and I wanted to share it with you!  This is an excellent way to mass-produce cards for the holidays because you get 2 to 3 cards worth depending on how many papers you cut at once.  Feel free to save this to your computer to use as a reference! (it is NOT sized to any exact measurements - this is just a reference sheet).


After layering my cut pieces of paper and adding a small sentiment sticker from my stash I attached my focal reindeer image and the holly and berries.  Lastly, I tied a satin ribbon around the top of my card and I was done!

Thanks for stopping by queenies!
Later gators!

Friday, November 6, 2015

Season's Greetings Shaker! | Sweet Stamps

Hello sweet people!

I'm so excited to bring you my first official post as a DT sweetie for Sweet Stamps!

I saw these little pair of Snow People and just KNEW it would make an excellent "snow globe" shaker card!


First I stamped Mr. & Mrs. Snow DUO with Memento Tuxedo Black Ink and colored them with my Spectrum Noir Alcohol markers.  I used Distress Ink in Stormy Skies to add a winter-y blue sky above the happy couple and then added stars, highlights and fun details with a white gel pen.


I die cut a large circle in a 6x6 sheet of Christmas tree paper (from my stash) with a Circle Die and then used the same die and a slightly larger scallop circle die to create a frame with green cardstock.

I assembled my shaker with a piece of acetate and filled it with a mixture of Sugar Sand, Clear Glass Micro Beads, and some blue micro beads (from my stash).  I didn't add any sequins or larger pieces because I wanted it to look like a snow bank the swishes from side to side as it shakes!  I finished the card with a layered sticker from my stash!

Take a look at the Sweet Stamps store - lots of awesome stuff to be had there!

Thanks for taking a look!
Later queenies!

Sunday, November 1, 2015

Sweet Stamps Challenge!

Hello people!

I'm so happy to announce that I am part of the Sweet Stamps Sweeties DT for the next several months!

Today I'm just dropping by to let you know that there is a new challenge up on the Sweet Stamps blog and the theme is ANYTHING GOES!

Click HERE to go join the challenge!

I created a little sample for this challenge and I am in LOVE with this focal image!


________________________


Other: Spectrum Noir Alcohol Markers, Queen & Co Sequins, Studio Calico Mr. Huey's, Stampin' Up! Ribbon

Thanks for stopping by today!!
Later queenies!

Monday, September 21, 2015

Paper Smooches SPARKS

Happy Monday people!!

It has been a happy, productive weekend in my craftroom.  Yesterday I decided to break out two stamp sets from Paper Smooches and participate in the SPARKS  challenge this week!


This week's challenge was anything goes - yay!!!

In my last post (HERE) I talked about my new-found love for Spectrum Noir Alcohol Markers so I decided to do one card coloring using ONLY Spectrum Noir Markers and the other using ONLY my Copic Markers.  Let's see the results!


First up is the card using ONLY Spectrum Noir markers.  I took my Paper Smooches' "FOLKal Points" set and stamped out my house, chicken, chick, lamb, and sun on my Neenah Bright White 120lb cardstock and cut them out with my Silhouette Cameo, using my new PixScan mat (more on this later!).


I LOVE the way this card turned out!  I think the ink blending using the Spectrum Noir markers is awesome!  I created a background for my card using mini Distress ink and a blending tool and then I used Kristina Werner's technique of dropping water on the inked piece and blotting it with a towel to create texture.

(Here's a tip! Interested in creating a scene like the one above, but you don't have any of those fancy scene-creating dies?  I didn't either!  I used the largest die in some of my older Spellbinders' label dies and just layered them over each other to create hills for my scene!)


The second card for the SPARKS challenge is this sweet baby card that I made using the "Pip Squeeks" set and ONLY my Copic Markers.  Obviously, these markers also blend perfectly and I love them, but, because of the expense, I don't have as many of these markers and I often have a bit less variety in my color choices.  I DID use a good blending technique if you want REALLY soft blending, but don't have many of the pastel colors.  I lay down a layer of the colorless blender all over the whole image and then take my slightly darker color and use a flicking motion to blend the darker color out to white. You can go back in that flick the colorless blender back the opposite way to remove any unwanted color from the highlighted side. (Hopefully that wasn't TOO confusing!)


This set is GREAT for creating a background and it came together REALLY quickly.  I went ahead and stamped the focal images on the background - just so I would have plenty of room to add those images when I color and cut them out later.

Join in the SPARKS anything goes challenge with me this week!  If you do, good luck!

Later queenies!

Sunday, September 20, 2015

Spectrum Noir Markers - First Projects!

Hello there!  I know, TWO posts in one week after being gone for so long!?   Who am I and what have I done with Britt!?

Well, I spent much of today playing with some new tools!  One of my favorites of these new things is my new set of Spectrum Noir Alcohol markers by Crafter's Companion.

I have purchased the small sets of markers that are available at Joann's (With coupons of course!) in the greens, browns, reds, purples, essentials, greys, and yellows.  I was really interested in filling in some of the color holes that I find I have in my Copic collection (I stopped buying them as much because they are SO expensive).

Guess what!? I LOVE these!  The results are amazing for the price and I KNOW I will need them all eventually!

I signed up for the email list on the Spectrum Noir website and found out that they have a monthly challenge, so I decided to enter a few cards to this month's challenge..which is EMBOSSING.  Let's get to the pretties, shall we?


Am I the only one who still has a few Tilda images?  Every once in a while I like to pull out one or more of my Magnolia stamps and ink them up!  Here I used one of my (NEW!) favorite color combos for orange. Spetrum Noir: OR1 and TN2....trust me, it is perfect.


I'm also in love with these Heidi Swapp word dies that I just got as well.  They aren't that new, but they have been a bit hard to come by until they were restocked at my Joann.  In the background I used a Tim Holtz embossing folder and inked it up to create a letterpress effect.


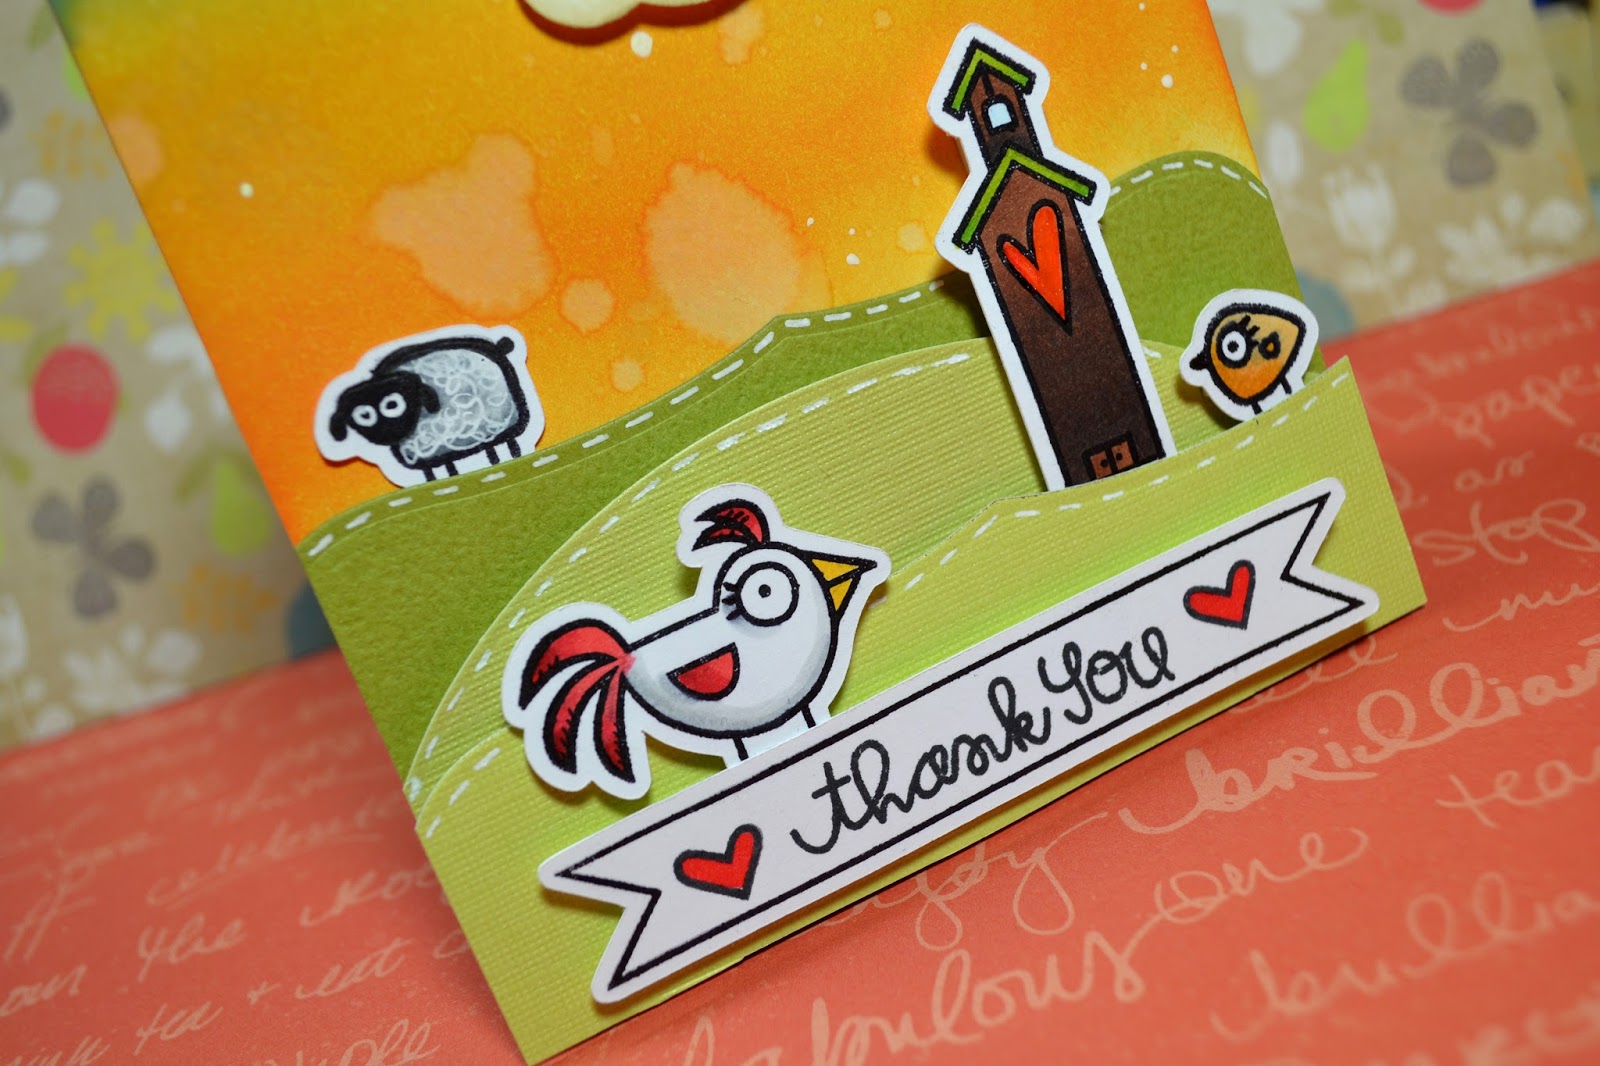
I have a new-found love for Paper Smooches stamps and so I couldn't wait to ink up this adorable set called "Market Fresh".  I used MANY of the Spectrum Noir markers on this card, but my favorite combo to come out of this card is that bottle green color. Spectrum Noir: DG2 and DG3.


I LOVE this Tim Holtz embossing folder!  I ran the folder through my Grand Calibur and then inked over it with some black ink. It came out better than I could have hoped!

Thanks so much for stopping by and check out the Spectrum Noir challenge for September!

Later queenies!

Friday, September 18, 2015

My Favorite Things Card Superstar!

Card Design Superstar


Holy cow people! How have you all been!?  I have been amazing and, as you have probably noticed....I've been on a break.

I decided that I needed a little break from crafting and especially from designing and blogging.  So, I stepped down from all my DT commitments and spent the summer hanging with my family, relaxing, and making some memories.

I missed you all SO MUCH though, and I missed bringing you inspiration and participating in this crafty world that I love.  So, I thought it would be fun to enter the AMAZING contest going on over at the My Favorite Things blog this month!

Without much more ado, please take a look at my entries!

I love these My Favorite Things girls!  So many of them are super versatile.  I've used this one from the "Wild For You" stamp set and just masked off the safari hat the's in the original image (the original version of this image is used in one of my other entries).


I love a bit of simple design.  This card was made simply because I LOVE the tiny little cameras from this Die'namics dies set!  With some washi and a little Wink of Stella this came together...in a flash! Hahaha!!


This is the original girl image and sentiment from "Wild For You" and I love how this image looks with the little polka-dot details all over her.  I thought this one would be perfect as a shaker card.  The shaker element adds just enough movement for this ADVENTURE card!


For this card, I wanted to see how many ways I could use a single Die'namics die.  I took this floral swirl die and created an embossed background by running the die through my big shot using the embossing mat.  It created a beautiful texture.  I also added a version of this floral swirl die to add a swirl to the front of the card and I finished the design with a sentiment from the "Wild For You" stamp set.


Thanks so much for taking a look! Wish me and the other entrants luck!

Later queenies!


Wednesday, May 13, 2015

PPV -(Episode 8) Sweet Baby With DCWV


Hello!  Just dropping by to let you know I have a new project up on the DCWV blog, featuring a new video!


Please LIKE and SUBSCRIBE for more videos!!

Later Queenies!

Saturday, March 28, 2015

Gold and Cork Blog Hop with DCWV and Tombow USA!

 Hello and Welcome to the Gold and Cork Blog Hop with Tombow USA and DCWV! We have 2 days full with gorgeous projects using GOLD and CORK! You probably came here from Jessica Pascarella but if you happened to stumble across my blog go to the  DCWV Blog to start!

__________________________


I hope you are having an awesome time hopping with Tombow and DCWV today!
I decided to take my DCWV Insta-Photo Fun album and make a fun gift item that keeps on giving!

I decorated the front of my album with a title that does double duty...as I will explain later!  I used Tombow Mono Multi glue to reinforce all my letter stickers on the cork background!


I created a little pocket for the front of my album with my We R Memory Keepers envelope maker to hold small 4x4 envelopes that I also made with the envelope maker.  The whole thing was attached to the inside of my album with Tombow Xtreme Adhesive - which is AMAZINGLY strong!


 Then, I created a set of 4x4 cards using the DCWV Gilded Paper Stack, some sequins, feathers, gold washi tape, ribbon, and gold Stickles.  I added a little dimension with Tombow Foam Tape and the sequins were adhered using Tombow Mono Multi glue (the BEST liquid glue for sequins!)


This is my FAVORITE sentiment of the moment!  It's by Unity Stamp Co.


There are lots of cut-apart borders and sheets of journaling cards in the DCWV Gilded Paper Stack.  I cut this "love you" circle from one of the journaling cards and filled in the heart with gold Stickles.


Once I was done creating my cards, I added the cards to my 4x4 page protectors that come with the DCWV Insta Fun Photo album.


And - PRESTO!  You have a lovely stationary gift that doubles as a mini photo album gift!  When the recipient of the album gets finished sending or giving the cards out they will still have a fun insta-sized album to fill with pictures.  You could also incude a few more page protectors with things like stamps and Tombow Adhesive dots (in four fun colors!) to expand the amount of mailing supplies you are giving and it leaves more spaces for photos when it comes time to turn this into a real photo album.


Here is the main adhesive I used! (I'm in LOVE with this foam tape and the little colored adhesive dots!)
________________________

What's a hop without PRIZES!?


To win, visit and comment on the participating blog posts. You have until March 31st at 11:59 EST to comment. A winner will be picked randomly and announced on April 1st 2015.

Tombow will be giving away: Tombow Xtreme Adhesive, NEW Tombow Adhesive Dots, NEW Tombow Foam Tape and everyone’s favorite the Tombow Mono Multi Liquid Glue!
DCWV will be giving away: The DCWV Gilded Stack, a 4x4 Cork Stack, Insta Kraft Album, Accordion Album and a set of Birthday Photo Props!

Remember to “Like” Tombow USA and DCWV on Facebook.


Saturday, March 28th:


YOUR NEXT STOP IS THE FABULOUS Jennifer Priest!

Thanks so much for hopping with us! 
Later queenies!

Tuesday, March 10, 2015

Bunny Love | DCWV Stencil Stack and MFT Sketch Challenge!

Hey hey!  Just dropping in to post my MFT Sketch Challenge entry!

All paper used (plus a few stencils) were from the DCWV Stencil Project Stack!


I also used a My Favorite Things Stamp set and this sketch:


And here is my card:


Thank you for taking a look!!

Later queenies!!!